Synthwave Synthscape
The Floor
We're going to create a 1980s synthwave scrolling demo.
Let's start with our usual clean loop, and we'll also give ourselves a couple of "Middle" variables so that we can keep track of the middle of the screen.
MiddleX=320
MiddleY=240

Repeat
CLS
ResetDraw

Flip
Forever
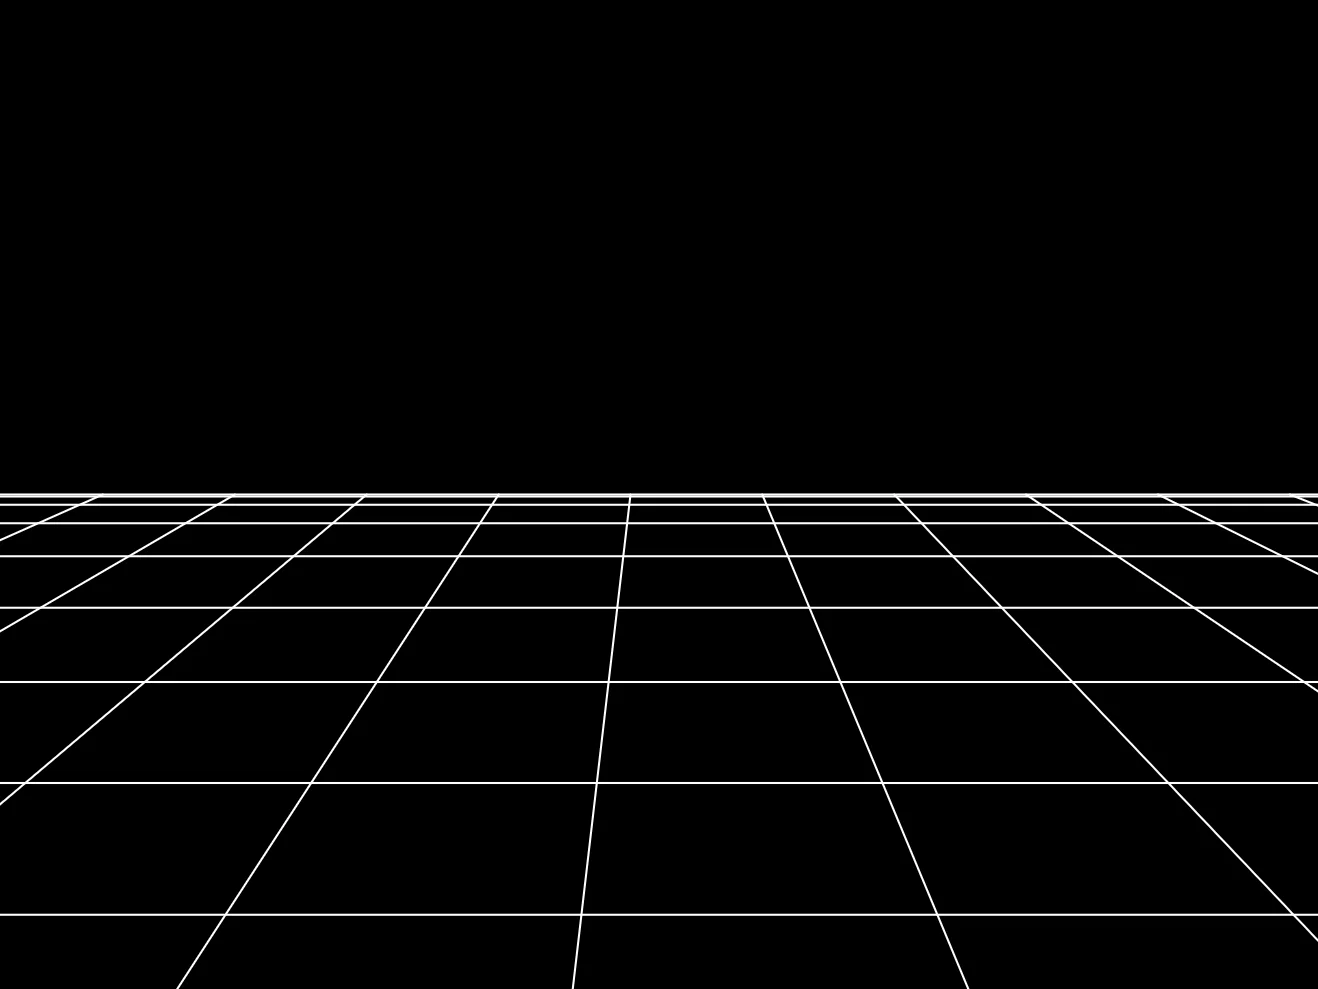
Let's begin with some horizontal lines.
These should start in the middle of the screen, and each line oughta be further and further apart.
We can do this with some very simple mathematics.
  // Horizontal Lines
  Y=MiddleY // Start from the middle
  For J=1 to 10
    // Draw the line
      Line 0,Y,640,Y
    // Move the Y position for the next line
      Y=Y+(J*J)
  Next

Perspective!
Verticality
Cool. Next we'll add some vertical lines to our floor, to make a nice grid that runs across the floor.
Let's start from the Middle, and draw lines running down the screen in 64 pixel intervals.
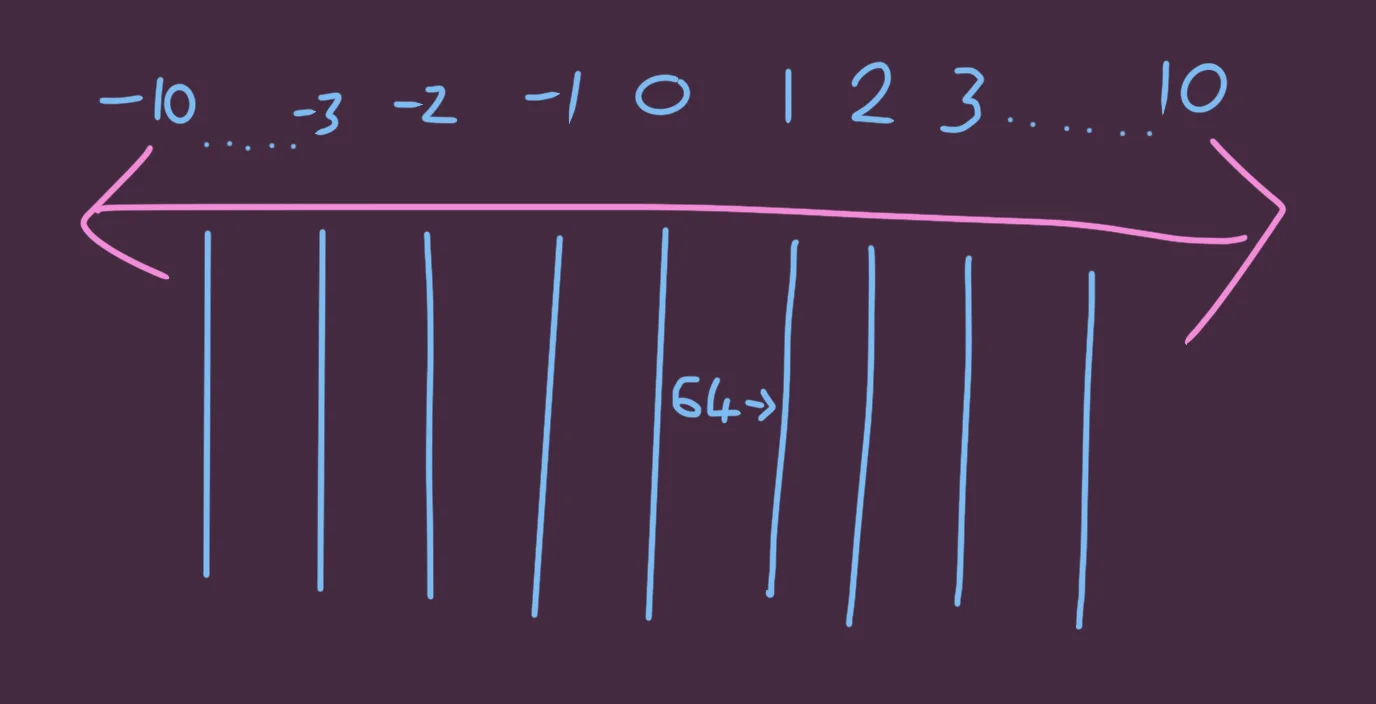
Each line should have a gap in-between.
  // Vertical Lines

  // Draw from minus 10 to plus 10
  // So that our middle line will be at zero.

  For J=-10 to 10
    X=(J*64)
    // Each X position has a 64 pixel gap

    // Then add the MiddleX to centre them
    Line X+MiddleX,MiddleY,X+MiddleX,480
  Next
We multiply each of the J values by 64, and then add it to the MiddleX value, to centre it on the screen.

Lines go down.
The computer doesn't know we want a 3D style, and will only do what we tell it to.
We're going to have to add more maths if we want something that looks more 3D.
Perspective
In order to create a more 3D Effect, we need to add perspective to our vertical lines, just like our horizontal lines had growing gaps between them.
Things far away tend to look nearer than things closer to us.
Fan the values out to create 3D depth.
If the gap at the top of our horizontal lines is 64, then to make the points at the bottom further away, all we really have to do is make the gap bigger.
We can multiply the X value, and it'll help to space things out for us.
    Line X+MiddleX,MiddleY,(X*3)+MiddleX,480
      // Multiply the lower X,
      // so it's 3 times as wide
Now the bottom is spaced out better, and we get a nice 3D effect!
This only works because our X value is centred at 0.
If we try adding MiddleX to the X value BEFORE we multiply it, then the MiddleX will get multiplied, too.
The middle would be in the wrong place.
Scrolling
Let's Scroll the lines!
You might think that scrolling this 3D Effect would be hard, but since we've already used maths to space everything out, all we really need to do is add a Scroll value to the X number.
We'll begin with a Scroll variable at the top of our code.
LineScroll=0
Once per loop, we'll move the Scroll.
We want the scroll value to move across, but we also need it to jump back to 0 when it gets too high, otherwise all of our lines will eventually scroll off the screen!
We can use the Wrap command to do this looping for us.
  LineScroll=Wrap(LineScroll+1,0,64)
  // Add 1 to the Scroll
    // Wrap between 0 to 64,
    // because our X gap is 64 pixels wide
We only want to add 1 once per frame.
We can now simply add this value to our X value inside our Vertical Lines loop
X=(J*64)+LineScroll
Now we're synthing!
Our Program so Far
// Synthwave Synthscape
// by Mr Green
// Created 2026/2/17

MiddleX=320
MiddleY=240

LineScroll=0

Repeat
CLS
ResetDraw

  // Vertical Lines

  LineScroll=Wrap(LineScroll+1,0,64)
  // Add 1 to the Scroll
    // Wrap between 0 to 64,
    // because our X gap is 64 pixels wide

  // Draw from minus 10 to plus 10
  // So that our middle line will be at zero.

  For J=-10 to 10
    X=(J*64)+LineScroll
    // Each X position has a 64 pixel gap

    // Then add the MiddleX to centre them
    Line X+MiddleX,MiddleY,(X*3)+MiddleX,480
      // Multiply the lower X,
      // so it's 3 times as wide
  Next


  // Horizontal Lines
  Y=MiddleY // Start from the middle
  For J=1 to 10
    // Draw the line
      Line 0,Y,640,Y
    // Move the Y position for the next line
      Y=Y+(J*J)
  Next

Flip
Forever
Layering The Sun
Let's add a big sun into the mix.
We'll just draw a great big circle. That'll do!
  // The Sun
  Oval MiddleX,MiddleY-80,240,240,64
A simple sun would do, but we can recolour it to add extra effect.
Let's draw it twice, at slightly different sizes, each time with a different shade of yellow.
  // The Sun
    // Outline
  SetCol 255,255,0
  Oval MiddleX,MiddleY-80,250,250,64
    // Inside
  SetCol 128,128,0
  Oval MiddleX,MiddleY-80,240,240,64

  // And don't forget to reset the colour after
  ResetDraw
Be sure to place your Sun at the right point in our program.
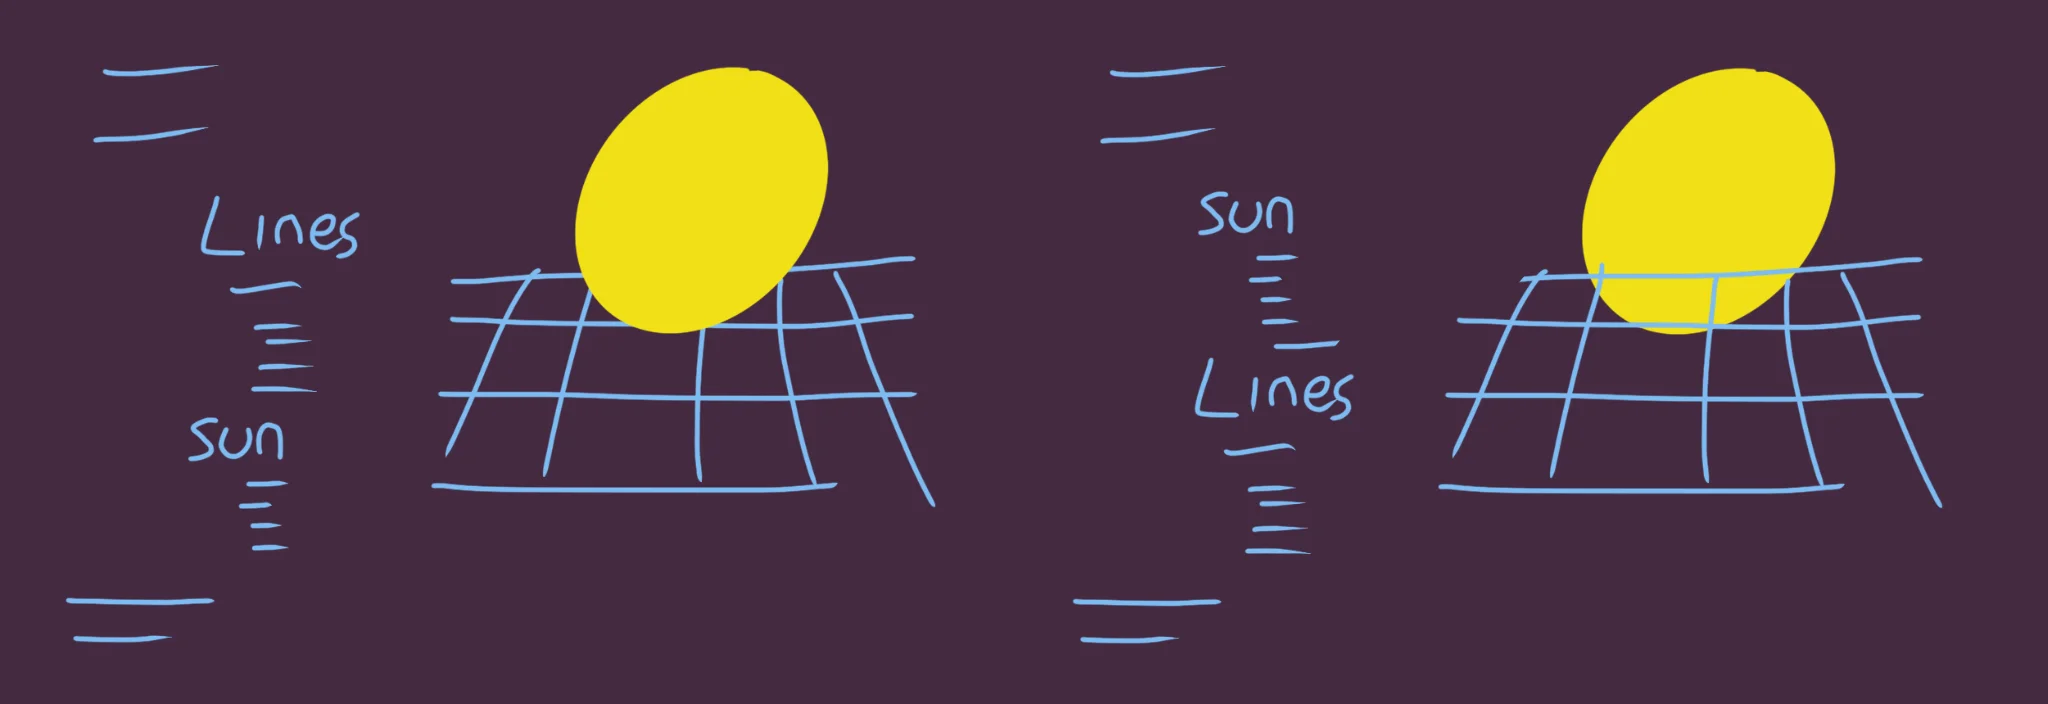
Before vs After
You want the sun to be drawn before the lines are drawn, otherwise the sun will be over the top of our lines.
Reflecting The Sun
Now that we have a sun, it sure would be nice to see a reflection in our floor, right?
We'll start by drawing a copy of our sun!
As well as drawing one sun at MiddleY-80, we'll draw a duplicate lower down at MiddleY+80
  // The Sun
    // Outline
  SetCol 255,255,0
  Oval MiddleX,MiddleY-80,250,250,64
      // Reflection
    Oval MiddleX,MiddleY+80,250,250,64

    // Inside
  SetCol 128,128,0
  Oval MiddleX,MiddleY-80,240,240,64
      // Reflection
    Oval MiddleX,MiddleY+80,240,240,64

  // And don't forget to reset the colour after
  ResetDraw
Ooooh, classy!
Let's add a "surface" for our reflection.
  // Semi-Transparent Floor
  SetCol 0,64,0,0.7
  Rect 0,MiddleY,640,480
    // And reset afterwards
  ResetDraw
This should go in-between our Sun and our Lines, so that the Sun is drawn behind the floor, and the lines are drawn over the top.
That's more Synthy now!
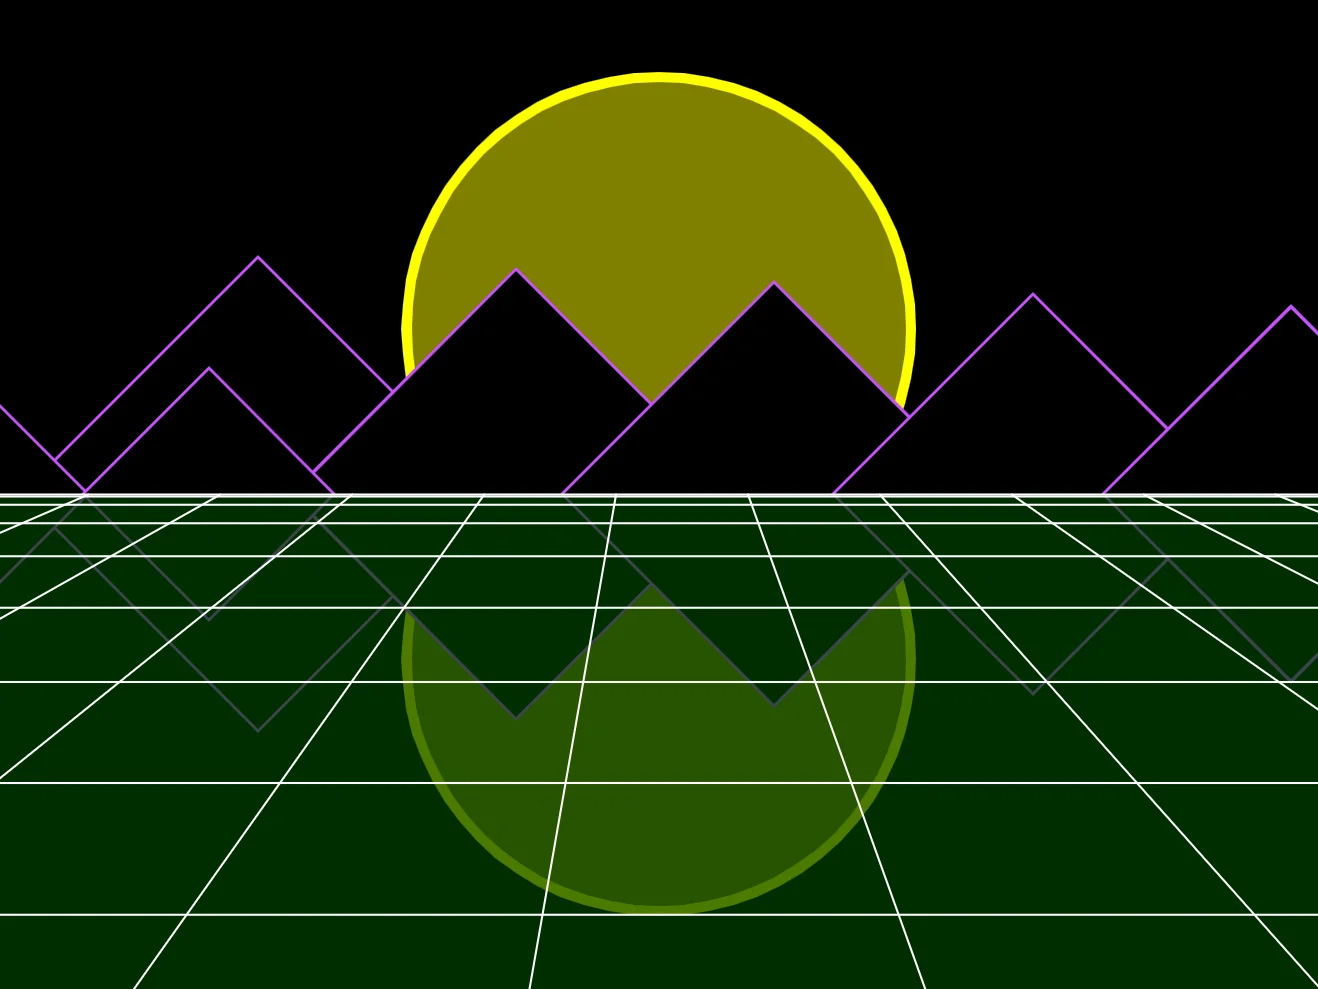
Mountain
It's time to add some mountains!
We'll draw some cheap triangles over the top of the horizon, to act like Synthwave Mountains.
We also want to draw the reflections, too. Though, since these mountains are touching the horizon, we can simplify this even further.
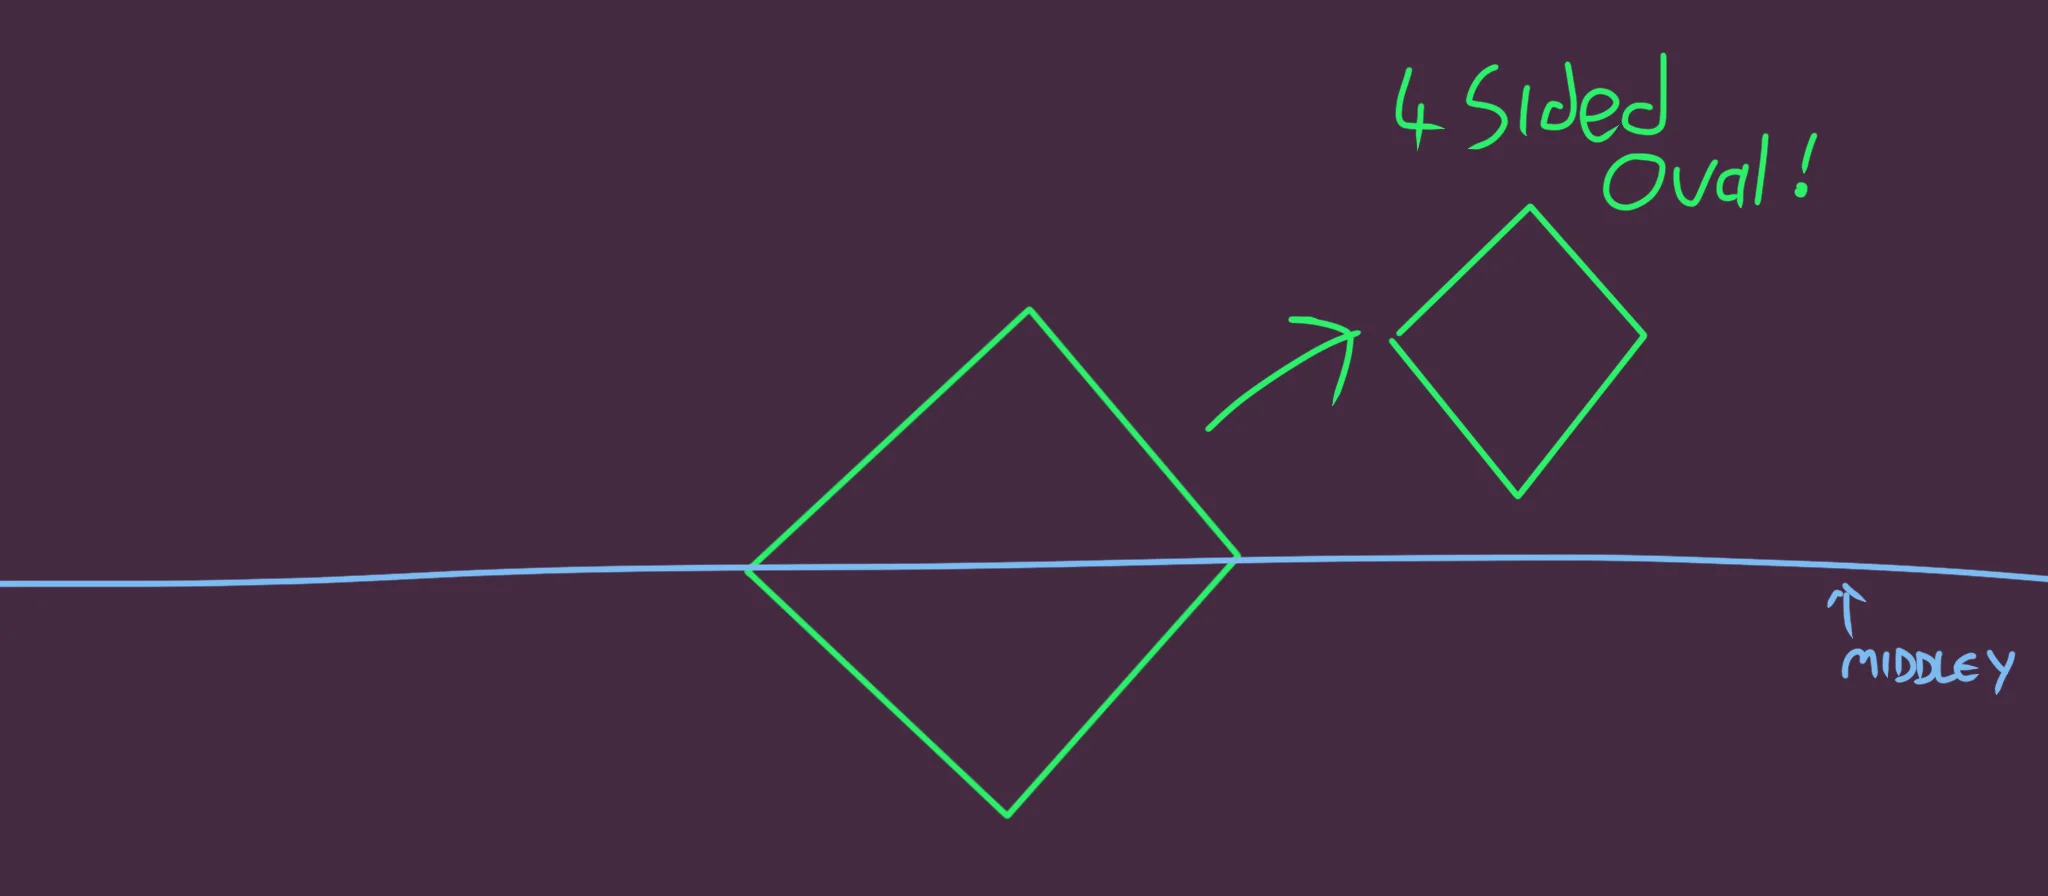
We actually want 4 sided Ovals.
Let's start with one mountain.
  // "Mountains"
  X=MiddleX
  Size=120
    // Purple Outline
  SetCol 200,80,255
  Oval X,MiddleY,Size+4,Size+4,4
    // Black Inside
  SetCol 0,0,0
  Oval X,MiddleY,Size,Size,4
  ResetDraw
Place this in between the Sun and the Floor, so that it appears in front of the sun, but the lower half of our 4-sided Oval is underneath the transparent floor.
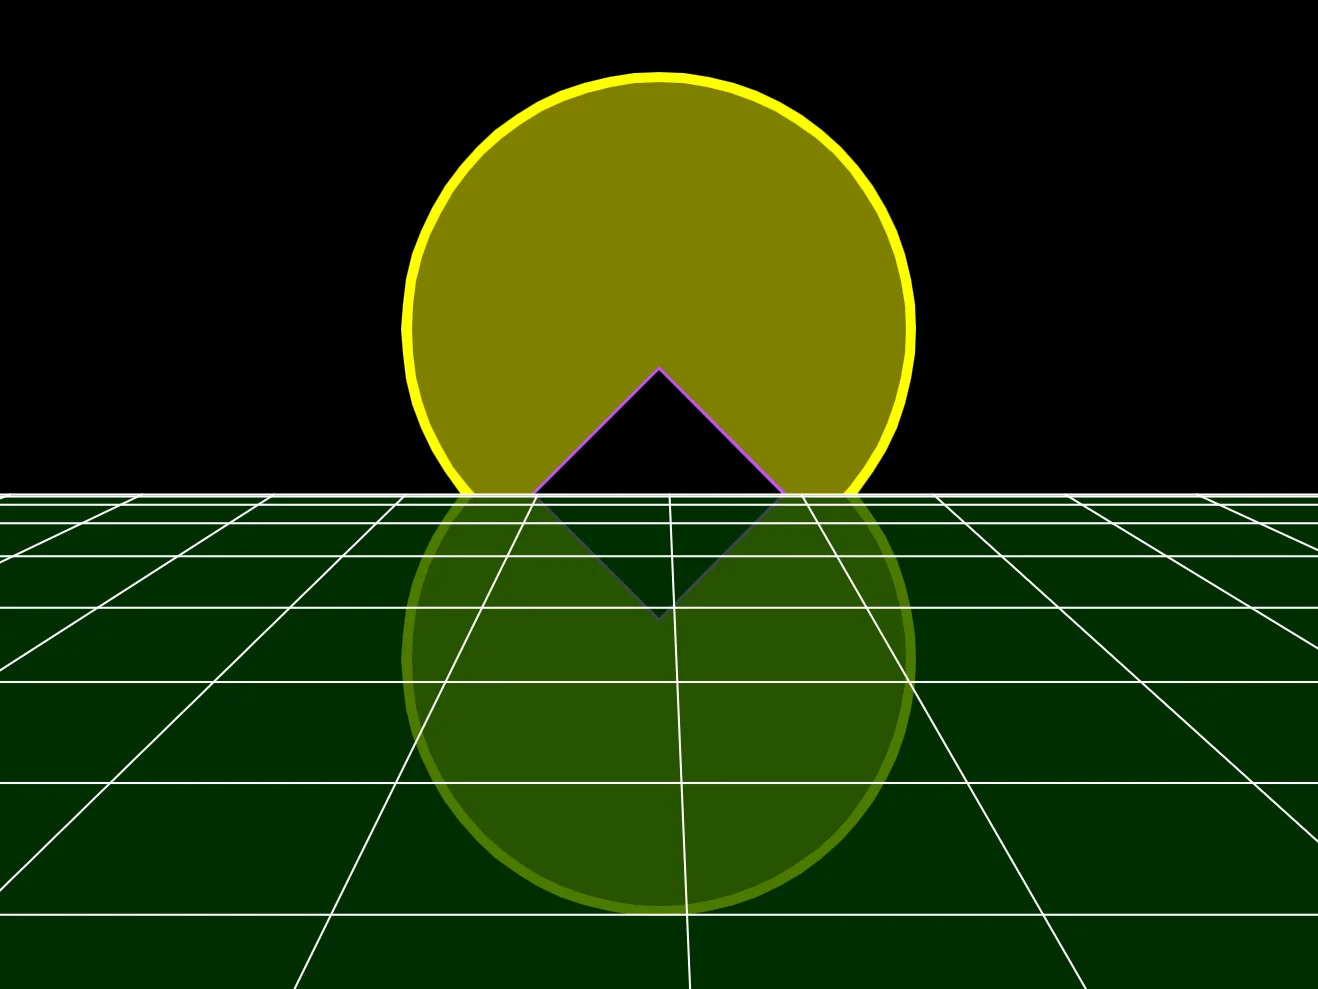
A diamond in the rough!
More Mountains!
OK, let's add a For-Next loop to draw multiple mountains.
Let's draw 10 mountains, and each one should be a distance apart from the last one, (we'll use 120 pixels).
Then we need to wrap them around the screen.
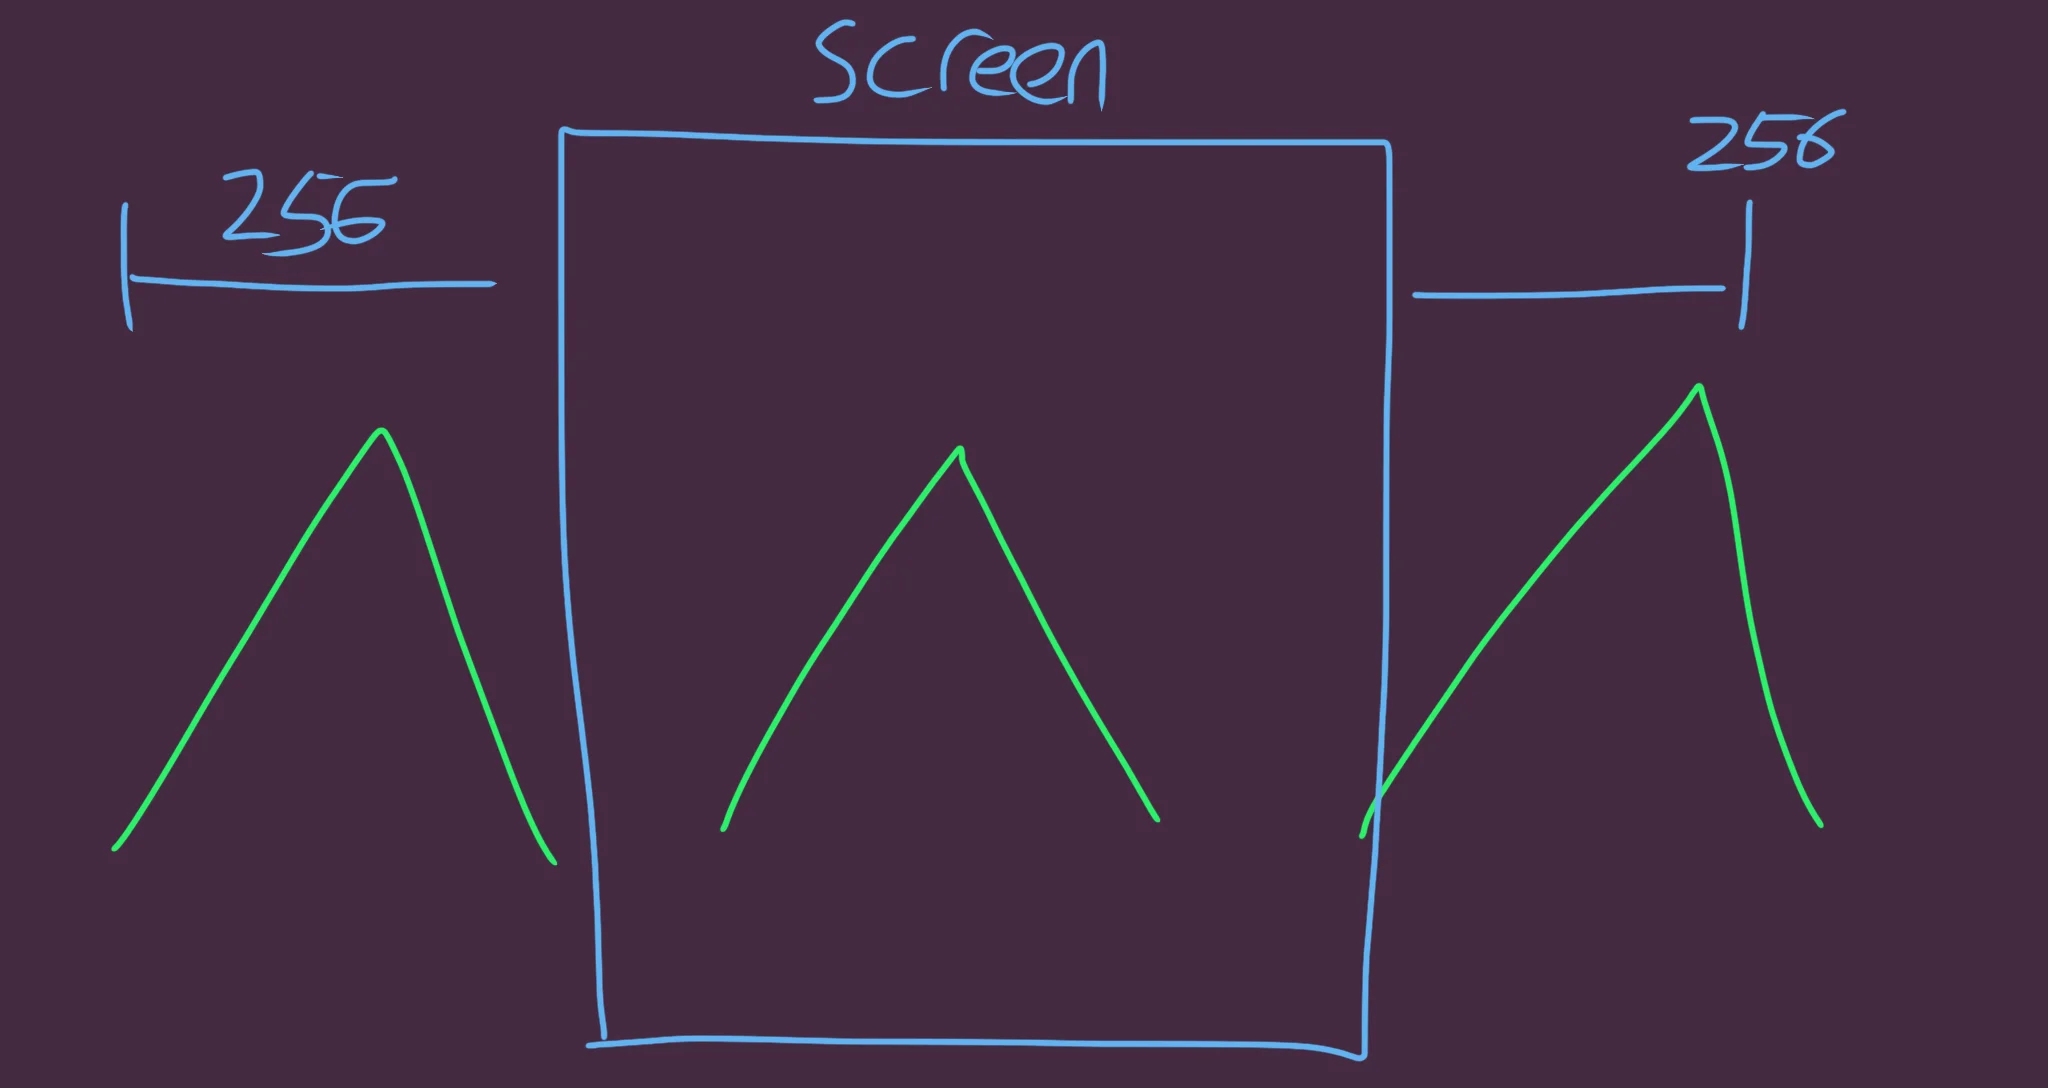
We'll add a 256 "buffer" to either side of the wrap, so that the mountains don't "pop" off and onto the edge of the screen.
The mountains should only wrap when they're too far off the screen to be visible.
We can also change the sizes, too.
Make the first mountain bigger, so that the last mountain is smaller, and appears in front of the larger mountain in the background.
By subtracting the value from a larger mountain size, the first mountain (J=1) will be the biggest, and each one after gets a little smaller.
  // "Mountains"
  For J=1 to 10
      // Move all the mountains, and wrap them around the screen
    X=Wrap(J*120,0-256,640+256)
        // Play with the 256 value to see how it looks when the mountains "pop"


      // The smaller mountains are in front of the larger ones
    Size=240-J*12
      // Purple Outline
    SetCol 200,80,255
    Oval X,MiddleY,Size+4,Size+4,4
      // Black Inside
    SetCol 0,0,0
    Oval X,MiddleY,Size,Size,4
  Next
  ResetDraw
Our Program so Far
// Synthwave Synthscape
// by Mr Green
// Created 2026/2/17

MiddleX=320
MiddleY=240

LineScroll=0

Repeat
CLS
ResetDraw

  // The Sun
    // Outline
  SetCol 255,255,0
  Oval MiddleX,MiddleY-80,250,250,64
      // Reflection
    Oval MiddleX,MiddleY+80,250,250,64

    // Inside
  SetCol 128,128,0
  Oval MiddleX,MiddleY-80,240,240,64
      // Reflection
    Oval MiddleX,MiddleY+80,240,240,64

  // And don't forget to reset the colour after
  ResetDraw


  // "Mountains"
  For J=1 to 10
      // Move all the mountains, and wrap them around the screen
    X=Wrap(J*120,0-256,640+256)
        // Play with the 256 value to see how it looks when the mountains "pop"


      // The smaller mountains are in front of the larger ones
    Size=240-J*12
      // Purple Outline
    SetCol 200,80,255
    Oval X,MiddleY,Size+4,Size+4,4
      // Black Inside
    SetCol 0,0,0
    Oval X,MiddleY,Size,Size,4
  Next
  ResetDraw


  // Semi-Transparent Floor
  SetCol 0,64,0,0.7
  Rect 0,MiddleY,640,480
    // And reset afterwards
  ResetDraw

  // Vertical Lines

  LineScroll=Wrap(LineScroll+1,0,64)
  // Add 1 to the Scroll
    // Wrap between 0 to 64,
    // because our X gap is 64 pixels wide

  // Draw from minus 10 to plus 10
  // So that our middle line will be at zero.

  For J=-10 to 10
    X=(J*64)+LineScroll
    // Each X position has a 64 pixel gap

    // Then add the MiddleX to centre them
    Line X+MiddleX,MiddleY,(X*3)+MiddleX,480
      // Multiply the lower X,
      // so it's 3 times as wide
  Next


  // Horizontal Lines
  Y=MiddleY // Start from the middle
  For J=1 to 10
    // Draw the line
      Line 0,Y,640,Y
    // Move the Y position for the next line
      Y=Y+(J*J)
  Next


Flip
Forever
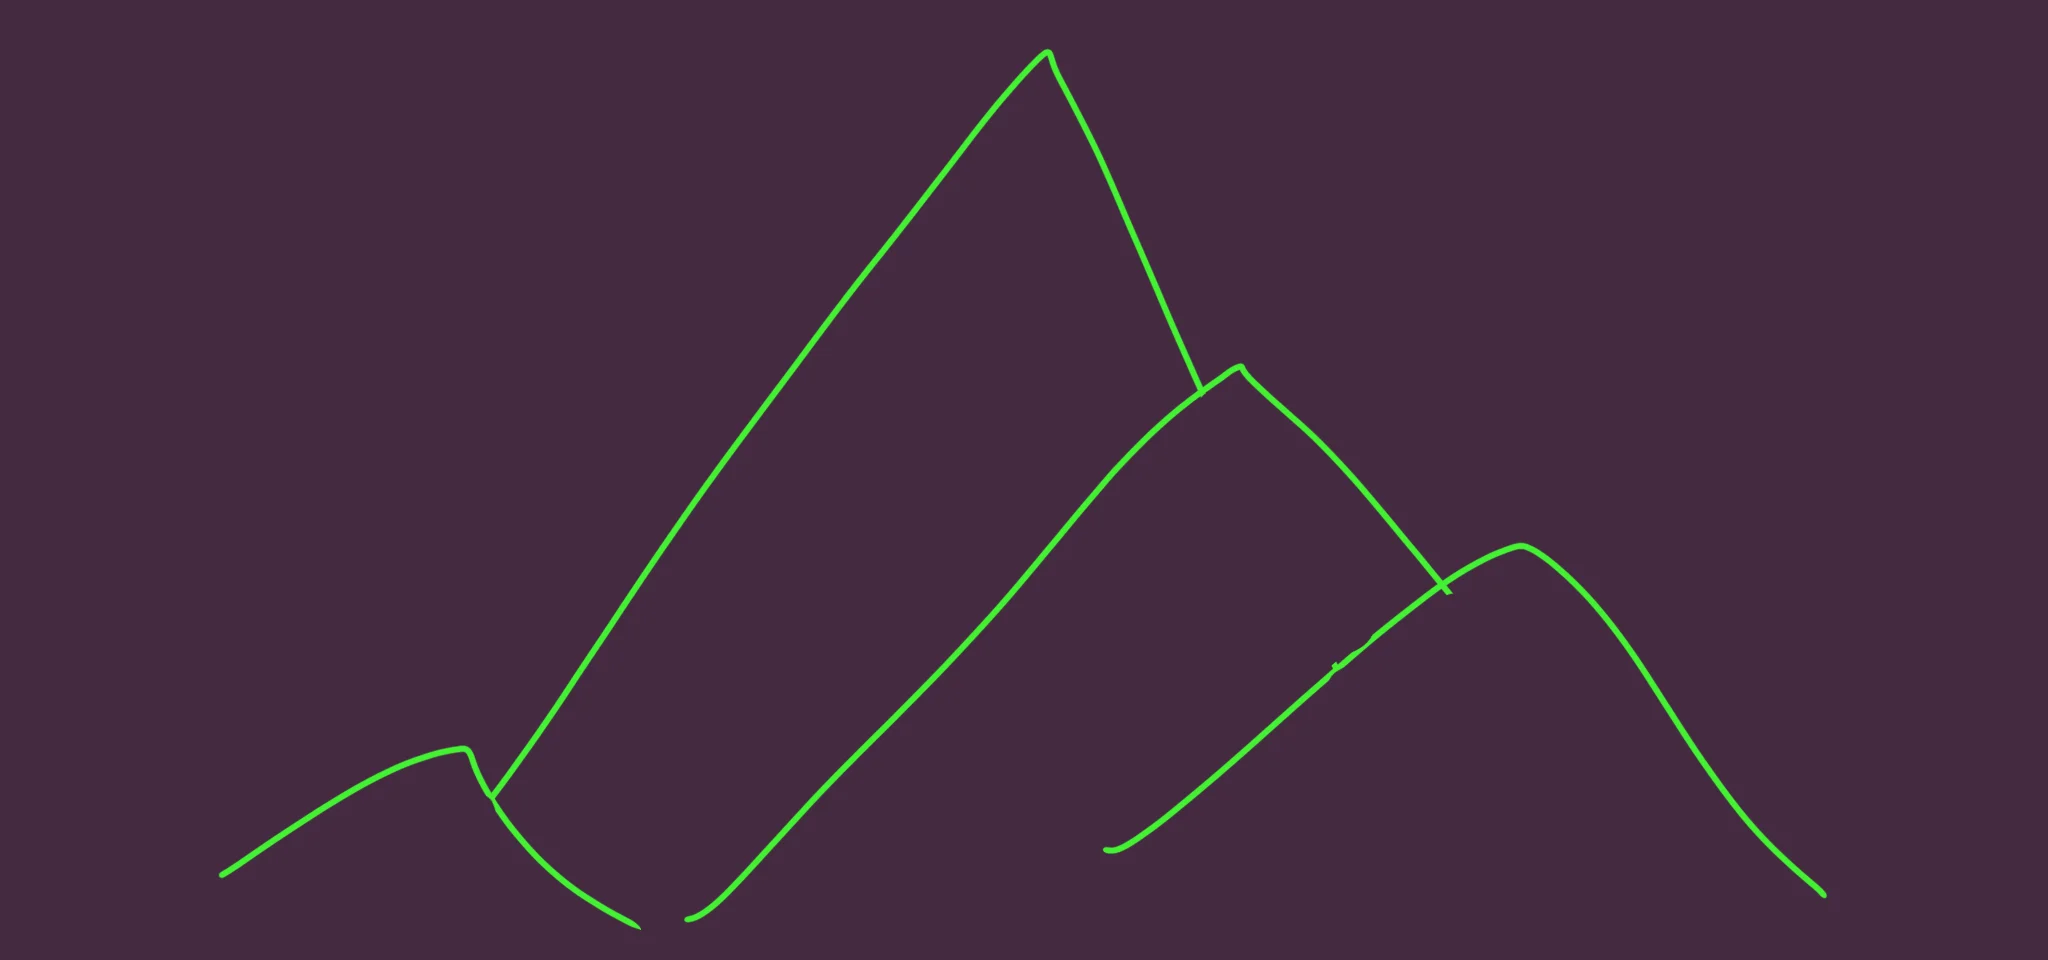
Move Every Mountain
Maybe we should do that, next?
Up at the top, we'll define a MountainScroll variable, next to our LineScroll one.
MountainScroll=0
Inside our Main loop, we'll increase that, to scroll the mountains.
  // "Mountains"
  MountainScroll=MountainScroll+1
Note that we don't need to wrap this value, since the Mountains already wrap their X co-ordinate.
And finally, we can add this value to each mountain.
X=Wrap(J*120+MountainScroll,0-256,640+256)
But there's something not quite right.
Though it's nice to see the mountains moving along, it'd be nice if they scrolled at different speeds.
That is, the further away a mountain is, the slower it should appear to move.
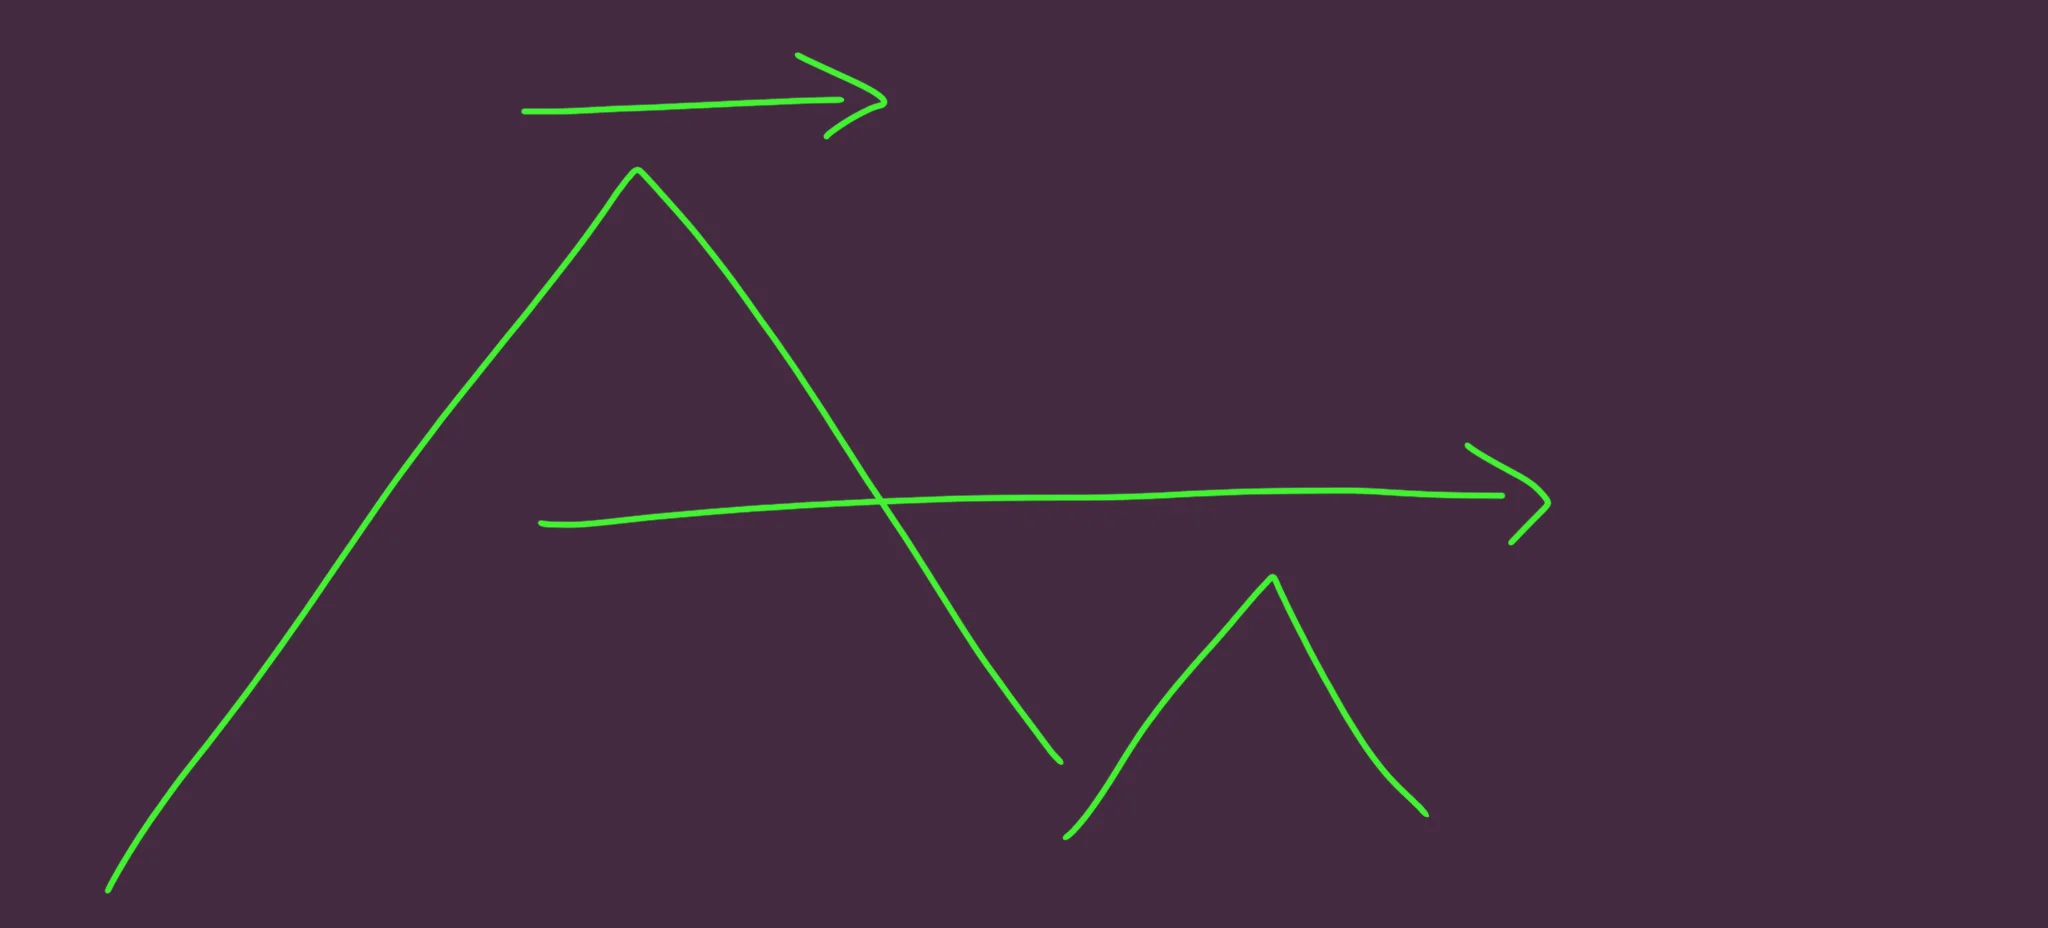
Closer = Faster
We need to create a Parallax effect. That is, to have the further mountains move slower than the closer ones.
Parallax
The furthest mountain is "J==1" and the closest mountain is "J==10"
If we want the closest mountain to move at full scrolling speed, then we'd need the furthest mountain to move at 1/10th of the speed.
That's our maths, right there. All we have to do is divide J by 10.
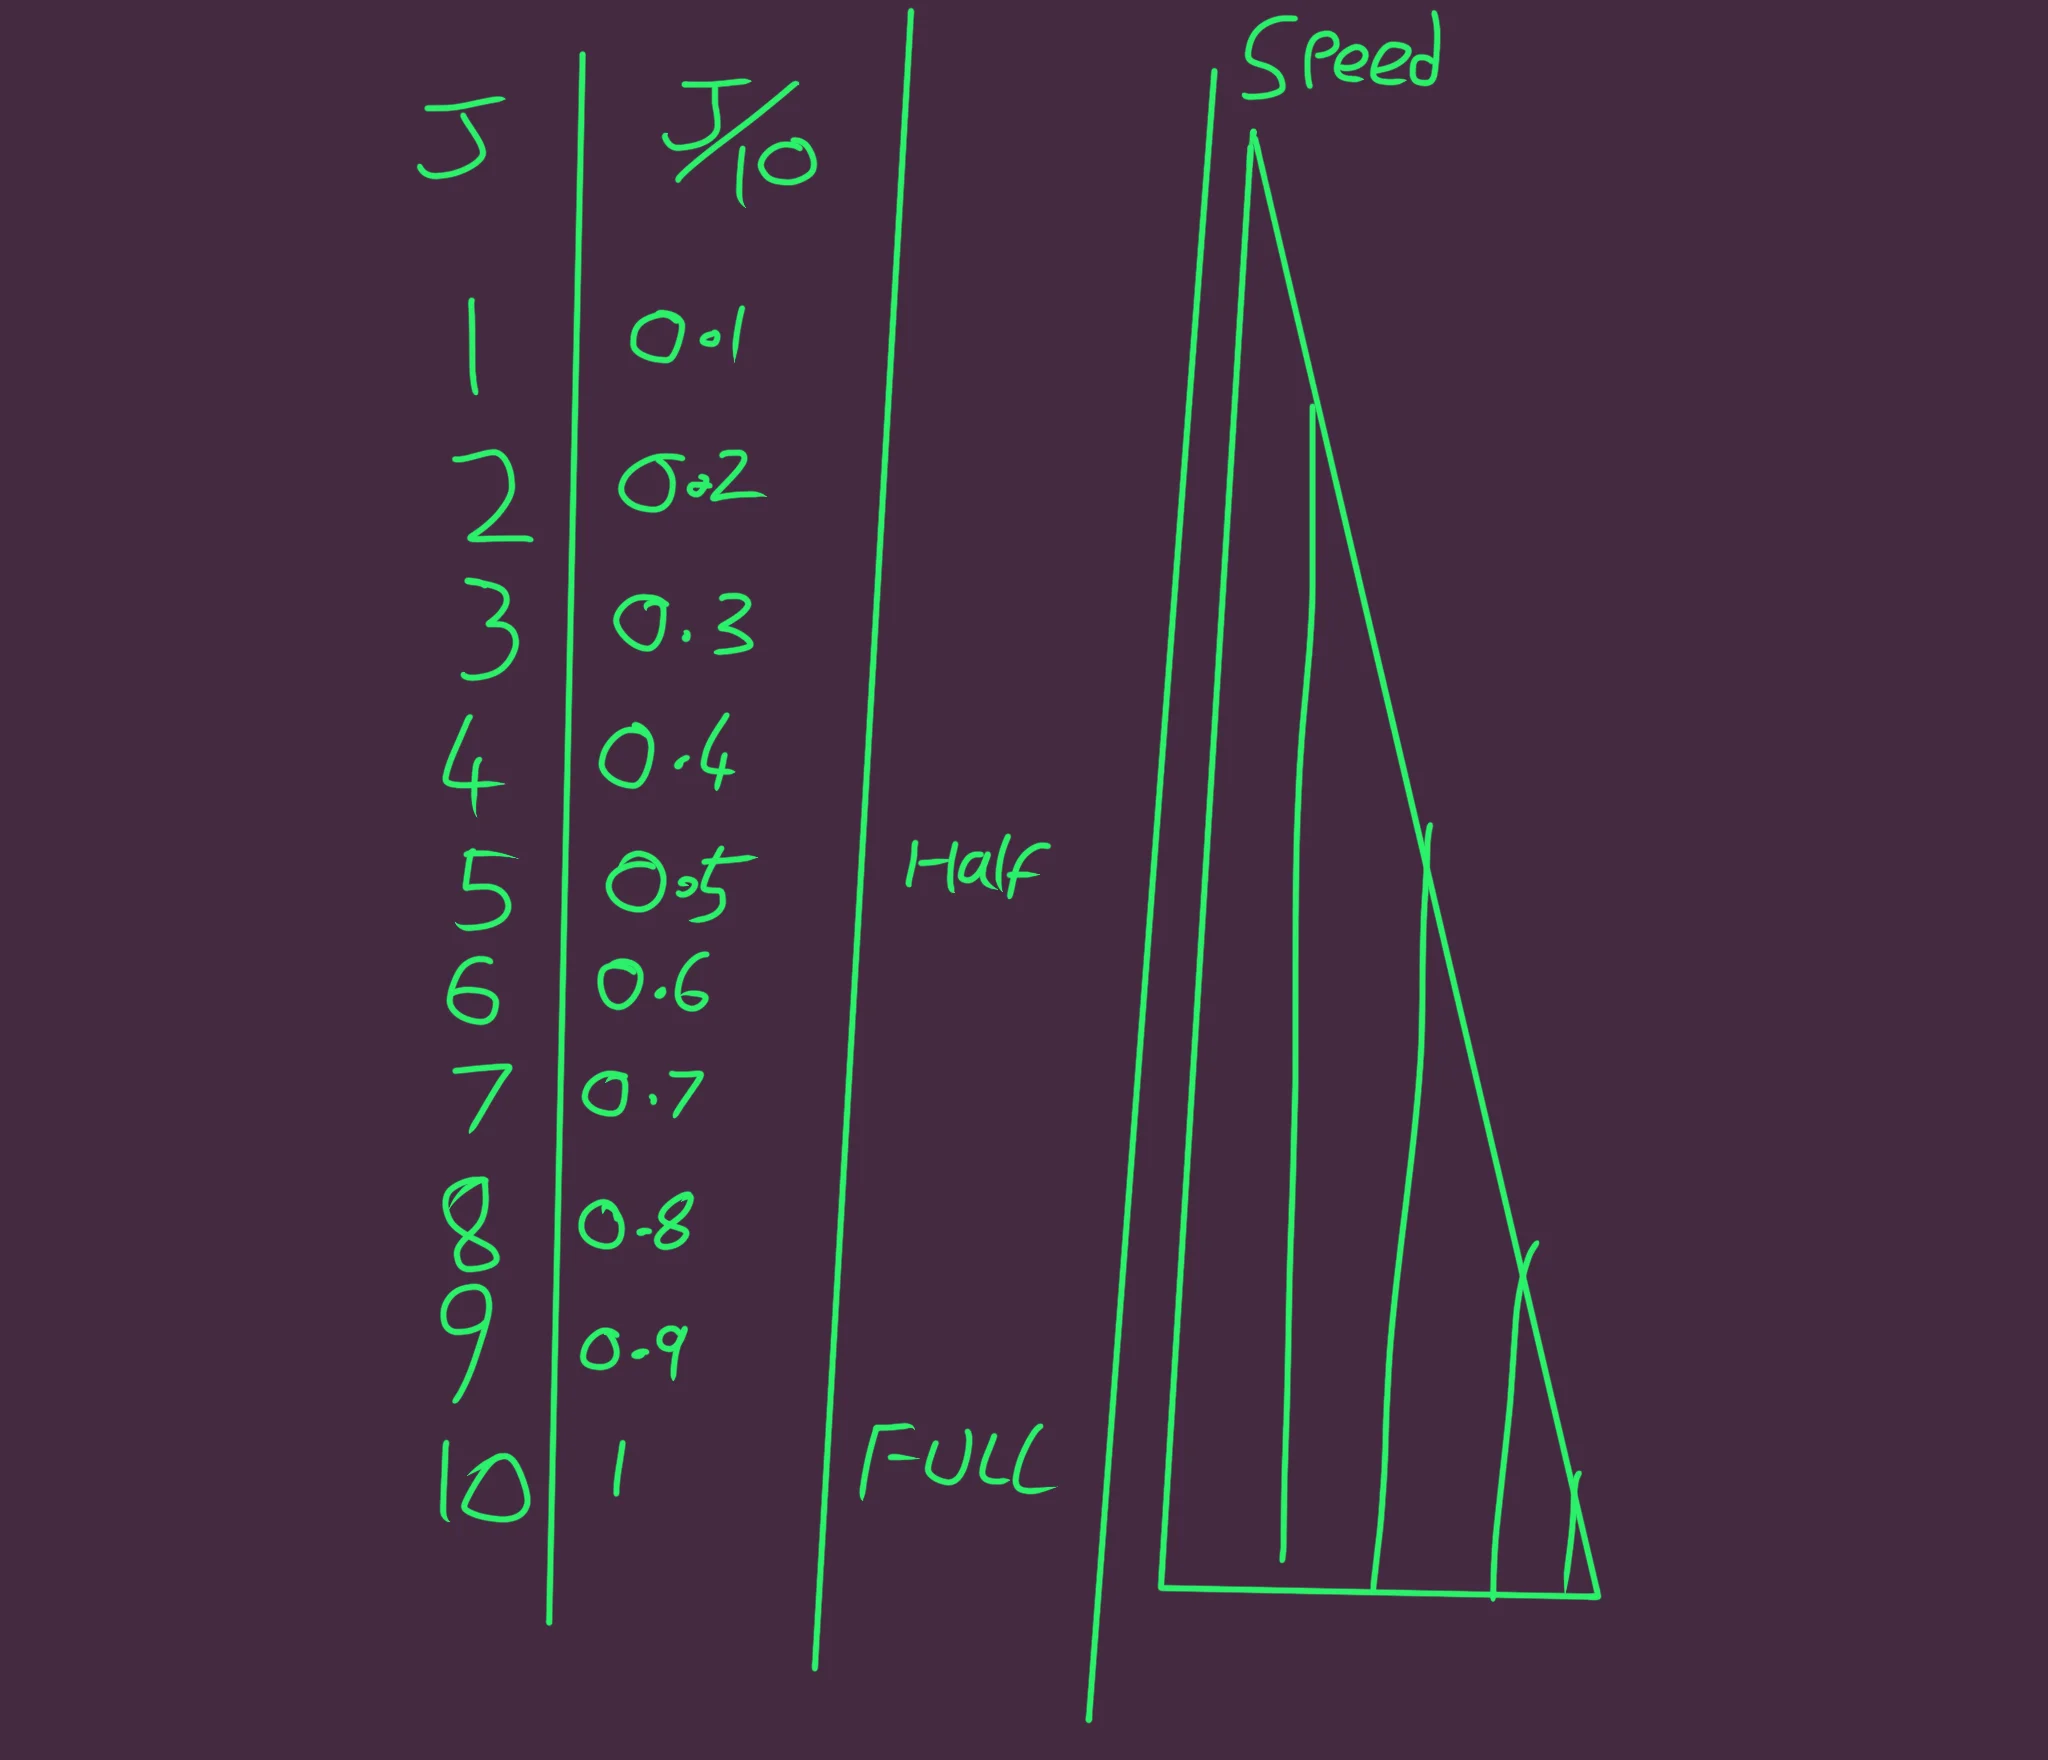
Smaller J = Slower Speed
As we divide by 10, the smaller J's get closer to 0 whilst the larger J's stay close to 1.
We'll place the Speed into a new Speed variable for each mountain, and then multiply the MountainScroll by this new Speed.
Replace the X=Wrap(.. line with this.
    Speed=J/10
    X=Wrap(J*120+MountainScroll*Speed,0-256,640+256)
Oooh, Synthy!
Final Touches
First, because we're starting the mountains at 0, they all start off very predictably.
Instead, where we create the MountainScroll variable, give it a random offset to start things off.
MountainScroll=Rand(500000)
That should help.
You might want to try juggling a few more numbers, though, to give it a more varied set of mountain positions.
      // Move all the mountains, and wrap them around the screen
    Speed=J/10

      // Create a wider offscreen wrap for each mountain
    WrapLimit=256+J*10
    X=Wrap(J*120+MountainScroll*Speed,0-WrapLimit,640+WrapLimit)
And what about the sky?
We can use the SetGradient to achieve a nice fade in the sky.
Simply give the command a dark colour for the top, and a lighter blue for the bottom, then draw a rectangle where we want the sky to be.
  // Gradiented Sky
      // High = Dark
            // Low = Lighter
  SetGradient RGB(0,0,10),RGB(0,0,90)
    // then draw a rectangle
  Rect 0,0,640,240
    // and don't forget to reset afterwards
  ResetDraw
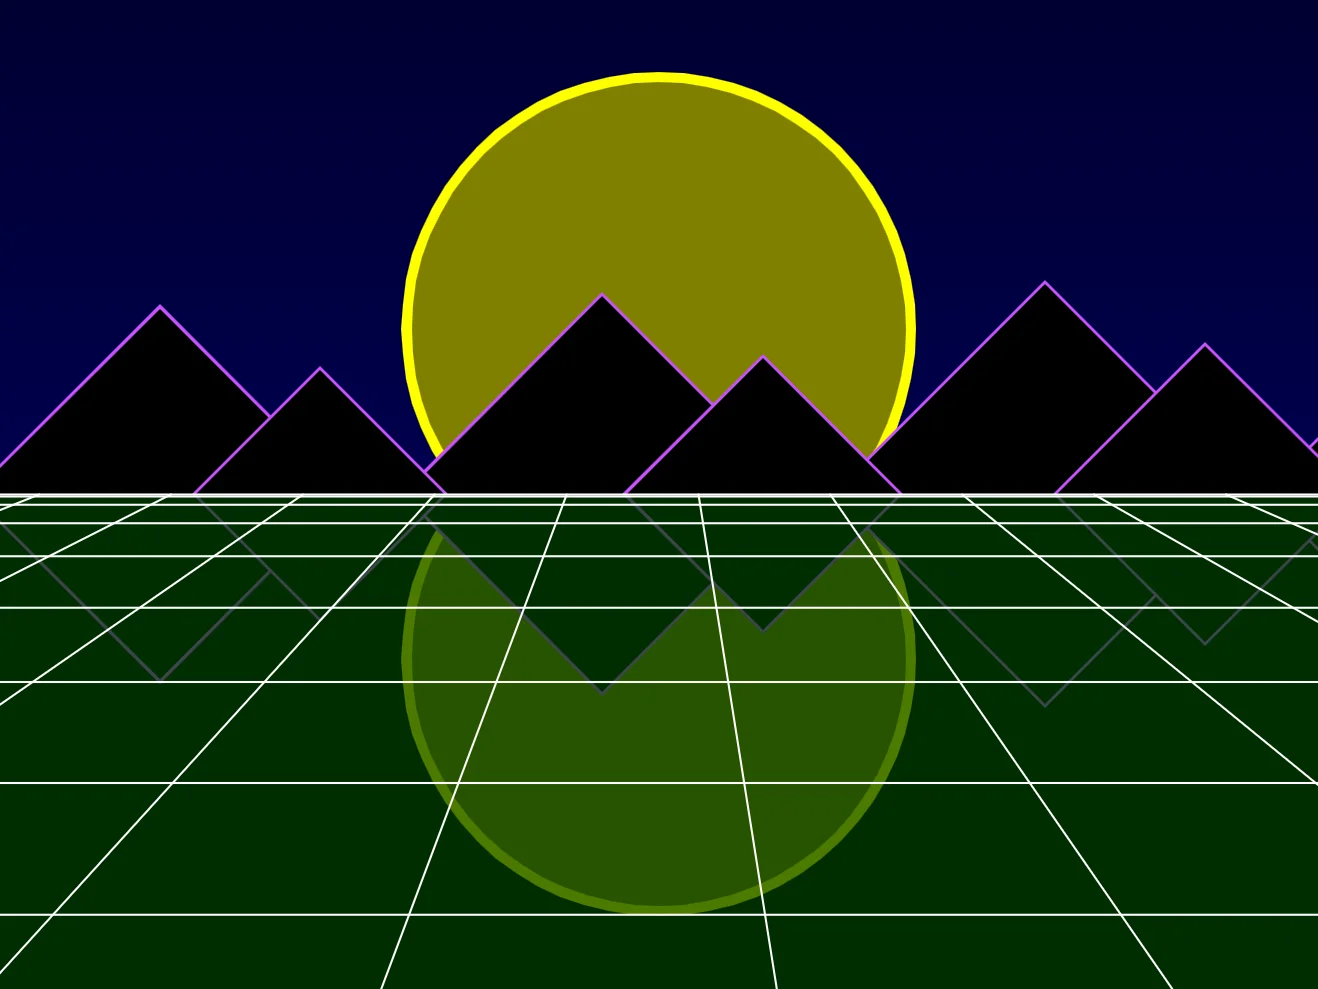
Blue, blue skies, I see.
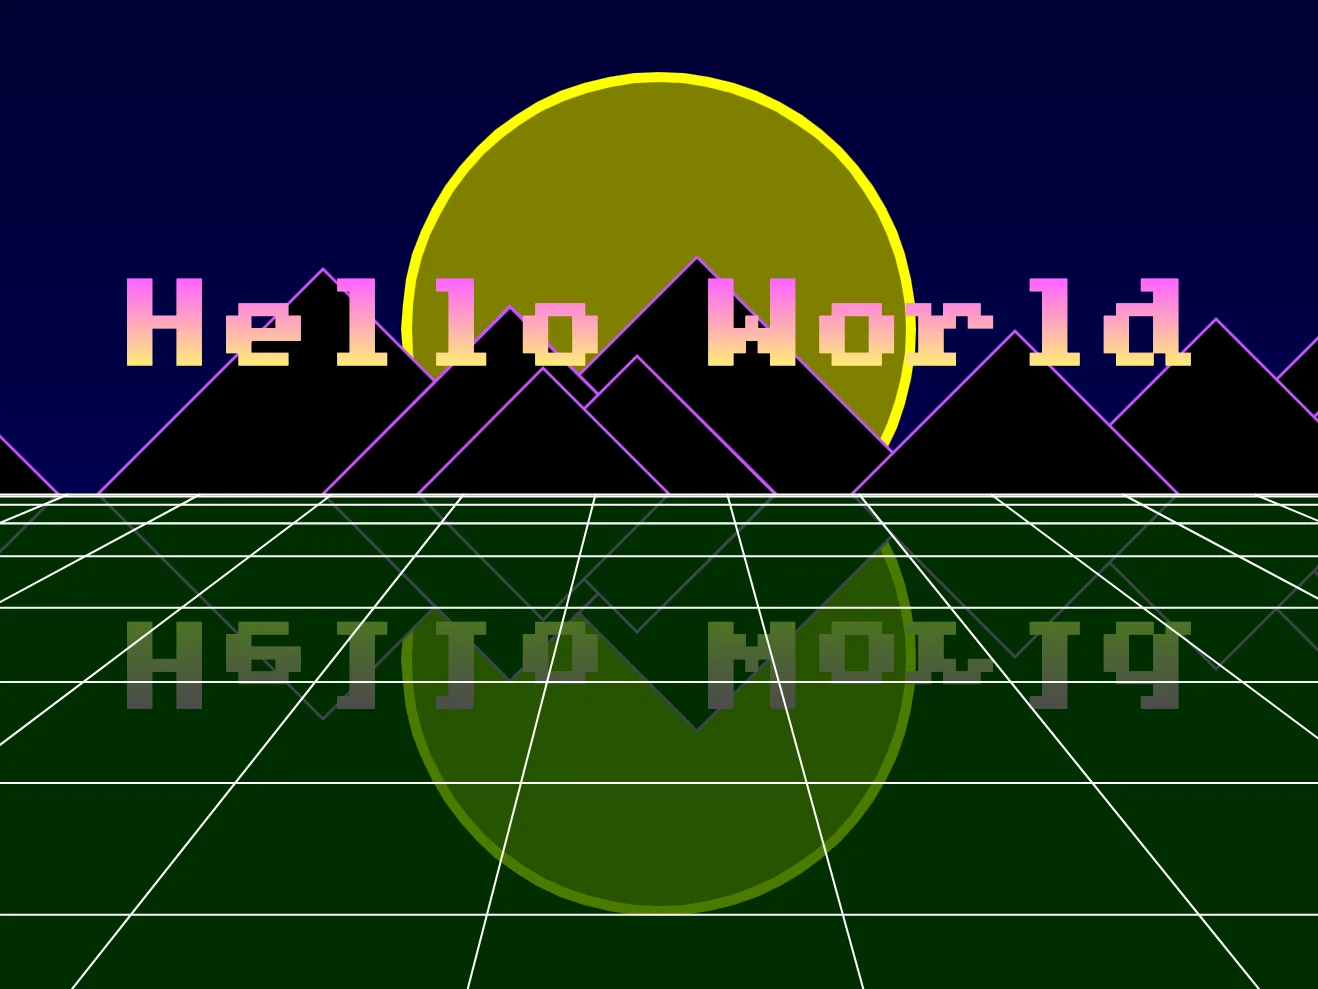
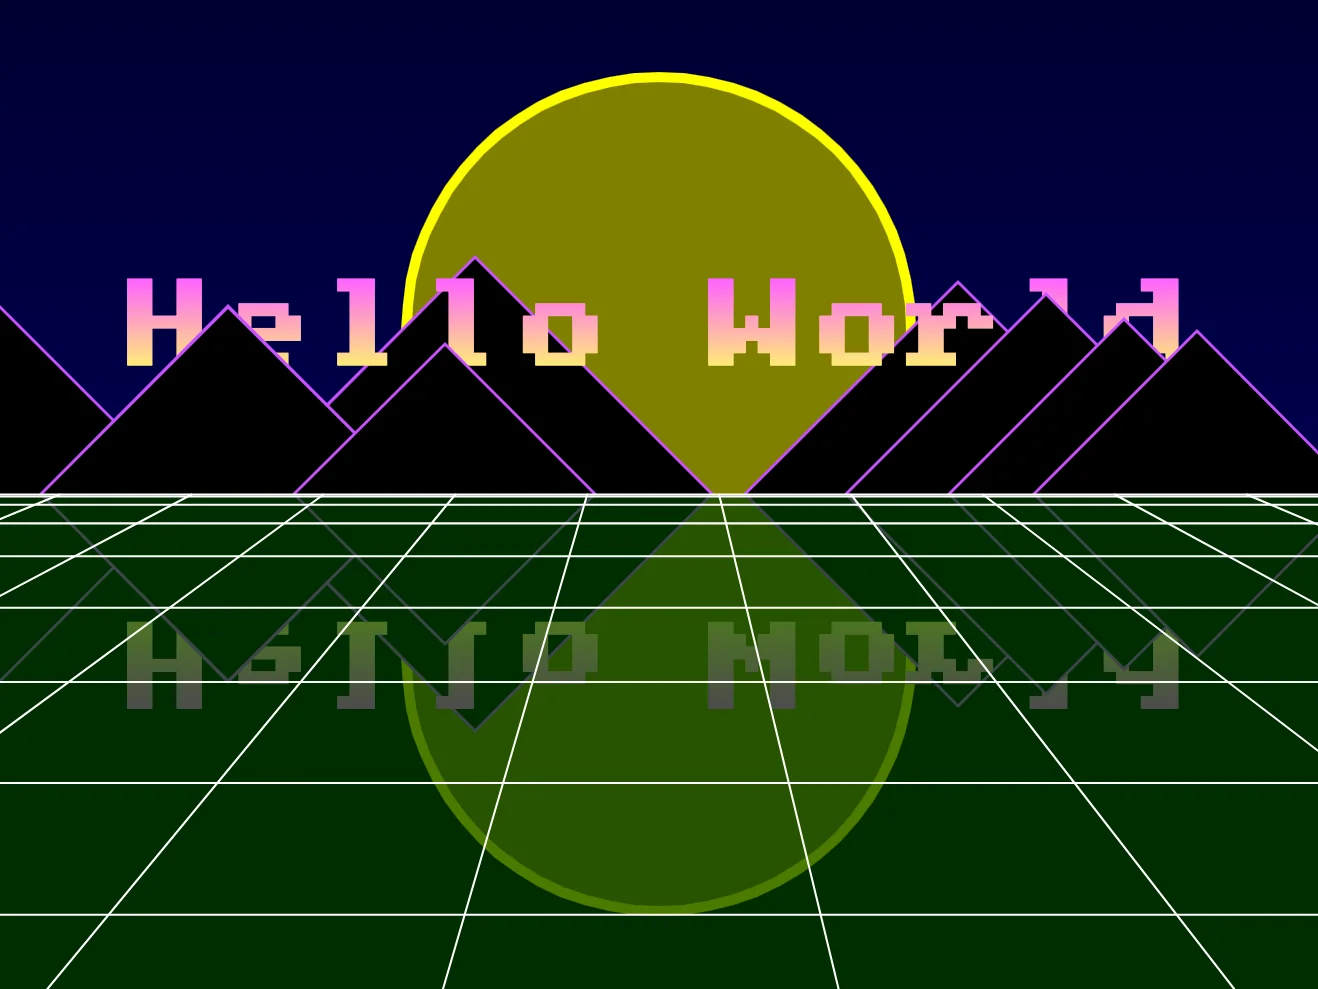
Hello World
Let's reuse this lovely Gradient effect for some text!
We'll have our gradient fade from a synthpop Pink down to a vibrant Yellow.
  // Add Text
  SetGradient RGB(255,100,255),RGB(255,255,100)
  SetFontSize 48
  Text MiddleX,MiddleY-80,"Hello World",1
We can also Flip the text upside down, so that we can draw it as a reflection, too.
    // Flip the Y scale to draw it upside down
  SetSize 1,-1
  Text MiddleX,MiddleY+80,"Hello World",1
    // And don't forget to reset the colour after
  ResetDraw
Whenever we draw things with negative scale, the gradient code will be reversed, along with what's being drawn.
This chunk of code should appear in front of the mountains, but behind the transparent floor.
Can you figure out where it goes inside our main loop?
So Synth!
Our Final Program
// Synthwave Synthscape
// by Mr Green
// Created 2026/2/17

MiddleX=320
MiddleY=240

LineScroll=0
MountainScroll=Rand(500000)

Repeat
CLS
ResetDraw

  // Gradiented Sky
      // High = Dark
            // Low = Lighter
  SetGradient RGB(0,0,10),RGB(0,0,90)
    // then draw a rectangle
  Rect 0,0,640,240
    // and don't forget to reset afterwards
  ResetDraw

  // The Sun
    // Outline
  SetCol 255,255,0
  Oval MiddleX,MiddleY-80,250,250,64
      // Reflection
    Oval MiddleX,MiddleY+80,250,250,64

    // Inside
  SetCol 128,128,0
  Oval MiddleX,MiddleY-80,240,240,64
      // Reflection
    Oval MiddleX,MiddleY+80,240,240,64

  // And don't forget to reset the colour after
  ResetDraw


  // "Mountains"
  MountainScroll=MountainScroll+1

  For J=1 to 10
      // Move all the mountains, and wrap them around the screen
    Speed=J/10

      // Create a wider offscreen wrap for each mountain
    WrapLimit=256+J*10
    X=Wrap(J*120+MountainScroll*Speed,0-WrapLimit,640+WrapLimit)

      // The smaller mountains in front of the larger ones
    Size=240-J*12
      // Purple Outline
    SetCol 200,80,255
    Oval X,MiddleY,Size+4,Size+4,4
      // Black Inside
    SetCol 0,0,0
    Oval X,MiddleY,Size,Size,4
  Next
  ResetDraw


  // Add Text
  SetGradient RGB(255,100,255),RGB(255,255,100)
  SetFontSize 48
  Text MiddleX,MiddleY-80,"Hello World",1
    // Flip the Y scale to draw it upside down
  SetSize 1,-1
  Text MiddleX,MiddleY+80,"Hello World",1
    // And don't forget to reset the colour after
  ResetDraw


  // Semi-Transparent Floor
  SetCol 0,64,0,0.7
  Rect 0,MiddleY,640,480
    // And reset afterwards
  ResetDraw

  // Vertical Lines

  LineScroll=Wrap(LineScroll+1,0,64)
  // Add 1 to the Scroll
    // Wrap between 0 to 64,
    // because our X gap is 64 pixels wide

  // Draw from minus 10 to plus 10
  // So that our middle line will be at zero.

  For J=-10 to 10
    X=(J*64)+LineScroll
    // Each X position has a 64 pixel gap

    // Then add the MiddleX to centre them
    Line X+MiddleX,MiddleY,(X*3)+MiddleX,480
      // Multiply the lower X,
      // so it's 3 times as wide
  Next


  // Horizontal Lines
  Y=MiddleY // Start from the middle
  For J=1 to 10
    // Draw the line
      Line 0,Y,640,Y
    // Move the Y position for the next line
      Y=Y+(J*J)
  Next

Flip
Forever
Here's a fun challenge for you.
Can you make it so that "Hello World" appears about halfway through the Mountains.
Mountains at the back should be behind the "Hello World", whilst mountains in front should appear in front of the text.
There's a couple of ways we can do this.
Either, split the Mountain For-Loop into two halves, placing one behind the text and the other in front.
Alternatively, you could use an "If J==" inside the Mountain For-Loop, and use that to draw the Text.
How might you achieve this effect?