More Input
Right!
We've seen how we can add Mouse control to our program, but what about Keyboard and Buttons?

It can be hard to keep track of all the different input styles.
One player might be playing a game on their computer keyboard, but a different person might be trying to play the game with a game controller plugged into their computer.
To make things easier for us, GotoJSE has a GamePad command.
This is another Return function, and we can give it different parameters to get Values for many different buttons.
Repeat
CLS
  If GamePad(ButtonRight) then Print "Right"
Flip
Forever
If you run this, you can hold the Right cursor on your computer, and the word "Right" will appear on the screen.
GamePad is an all-in-one command. It takes all the inputs it can think of, and tries its best to keep track of whatever the player is playing with.
The If command will always assume that we mean "is true", unless we specifically ask it otherwise.
A Lot of Buttons
There's a lot of buttons that the GamePad command can return.
ButtonRight is easy enough, as are ButtonLeft, ButtonUp and ButtonDown.
As well as those we can use ButtonA, ButtonB, ButtonX and ButtonY.
Think of these as buttons on a Nintendo Gamepad.
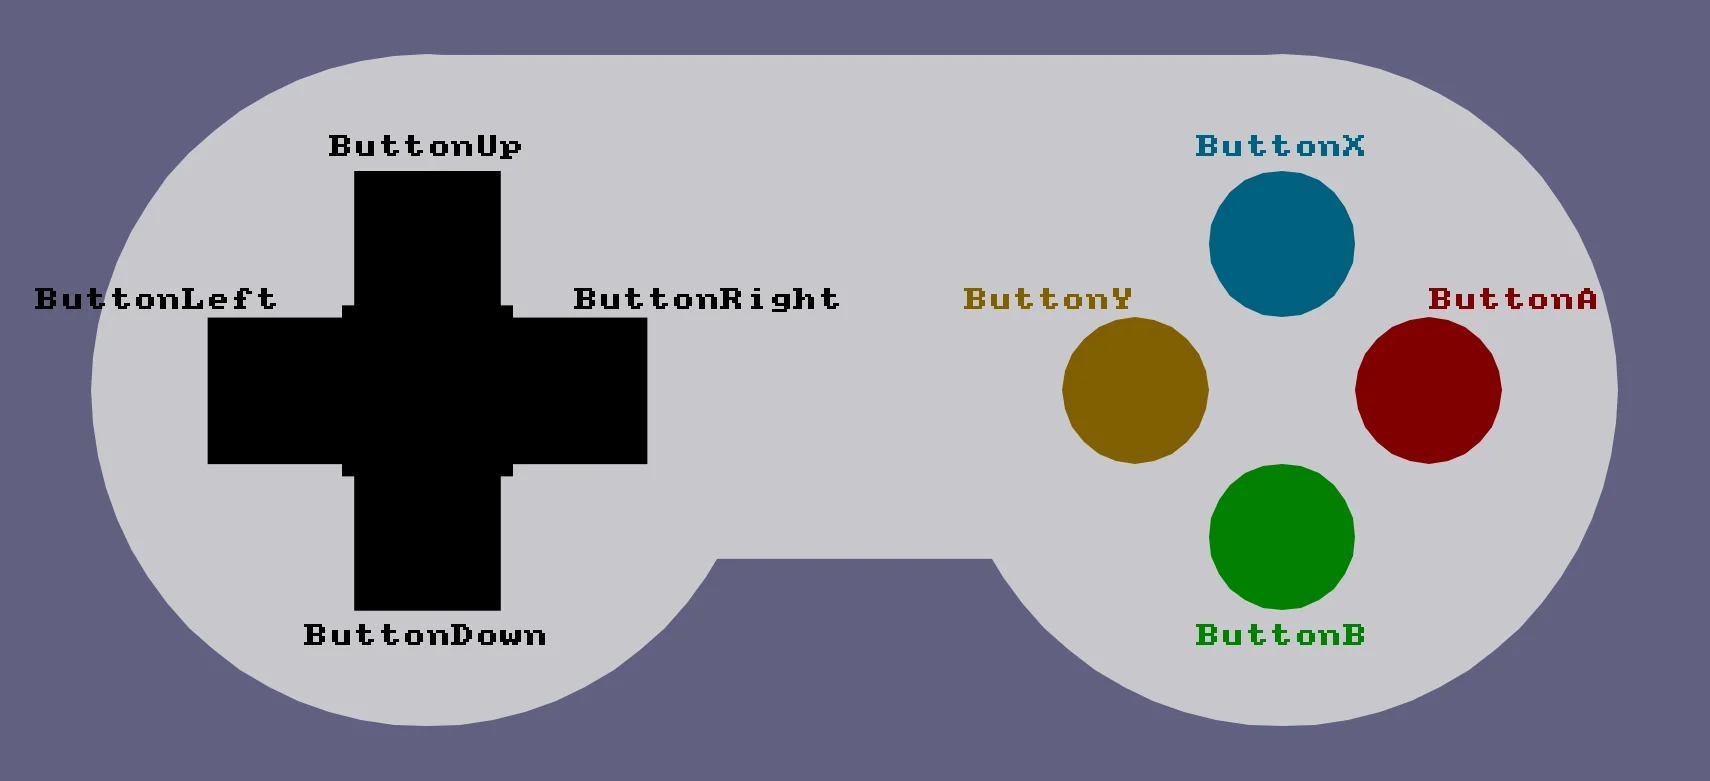
A is our main button, B is a secondary button, and then Y and X are there if we need them.
On the keyboard these are the Z,X,C and V keys, since they're all lined up in a row, nice and neatly.
We can also use the Spacebar for the A button, and the Alt key for B.
Repeat
CLS
  If GamePad(ButtonUp) then Print "Up"
  If GamePad(ButtonDown) then Print "Down"
  If GamePad(ButtonLeft) then Print "Left"
  If GamePad(ButtonRight) then Print "Right"
  If GamePad(ButtonA) then Print "A Button"
  If GamePad(ButtonB) then Print "B Button"
  If GamePad(ButtonX) then Print "X Button"
  If GamePad(ButtonY) then Print "Y Button"
Flip
Forever
You can even try using your mouse with the onscreen gamepad!
If the player is using a Thumbstick on a controller, the GamePad(ButtonRight) and other direction commands will return values between 0.0 and 1.0, depending on how "tilted" the stick is.
Let's Doodle again
OK, let's take what we've learned and make a new version of our Doodle program from the last lesson.
X=320
Y=240

// We'll add a speed for our dot to move in
Speed=4

Repeat

  // Move Up if ButtonUp is pressed
    // That is, reduce the Y co-ordinate
  If GamePad(ButtonUp) then Y=Y-Speed

  // Move Down if ButtonDown is pressed
  If GamePad(ButtonDown) then Y=Y+Speed

  // Move Left if ButtonLeft is pressed
  If GamePad(ButtonLeft) then X=X-Speed

  // Move Right if ButtonRight is pressed
  If GamePad(ButtonRight) then X=X+Speed

  // Then draw the oval
  Oval X,Y,8,8

Flip
Forever
This is the same idea as our Mouse Doodle program, except we're now using the GamePad button commands to move the Oval, instead of moving it to the mouse's position.
Snowman
Let's build a snowman!
Repeat

// We can change the CLS colour?
CLS 160,190,220


  // Snow White
  SetCol 255,255,255
  // Head
  Oval 320,200,64,64
  // Body
  Oval 320,260,96,96

  // Coal Black
  SetCol 0,0,0
  // Eyes
  Oval 320-10,200-10,10,10,5
  Oval 320+10,200-10,10,10,6

  // Carrot Orange
  SetCol 255,160,0
  // Nose
  Oval 320+5,200,20,5,4

Flip
Forever

A happy snowman
He looks ok, right?
Arms
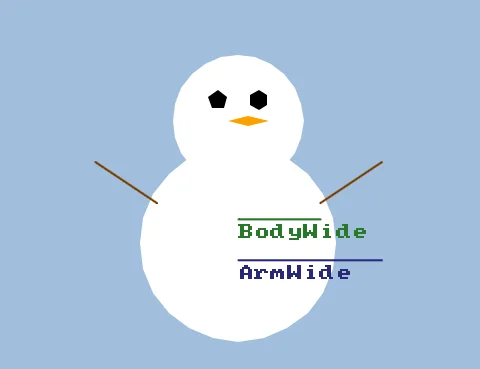
Let's arm the snowman! With arms!
We'll set up some variables for his arms.
ArmHigh=220
BodyWide=40
ArmWide=70
ArmHigh will be the height of the tip of his arms.. His fingertips!
The BodyWide will be where the arms are attached to his body, and ArmWide will be how outstretched they are.
We can then draw two little stick arms nice and easily.
// Arm Variables
ArmHigh=220
BodyWide=40
ArmWide=70

Repeat

// We can change the CLS colour?
CLS 160,190,220

  // Snow White
  SetCol 255,255,255
  // Head
  Oval 320,200,64,64
  // Body
  Oval 320,260,96,96

  // Coal Black
  SetCol 0,0,0
  // Eyes
  Oval 320-10,200-10,10,10,5
  Oval 320+10,200-10,10,10,6

  // Carrot Orange
  SetCol 255,160,0
  // Nose
  Oval 320+5,200,20,5,4

// New Bit!

  // Stick Brown
  SetCol 120,60,0
  // Arms

  // We'll attach his arms slightly higher than the body
  Line 320-BodyWide,240,320-ArmWide,ArmHigh
  Line 320+BodyWide,240,320+ArmWide,ArmHigh

Flip
Forever
He's happier with arms!
Motion!
OK, now we'll give him a little wave.
We'll focus on the ArmHigh variable.
If we move that Value up and down, we can make his little arms wave about.
We should add a new Variable to control the movement of the arms. Let's call it ArmWave.
We'll make it so that normally ArmWave will move downwards (1), but if we hold ButtonA, (Spacebar or Key Z) then ArmWave should move upwards (-1)
Adding 1 to ArmHigh makes the Y value higher, which moves the Arm down the screen. Whereas taking 1 away makes the Y value lower, which moves the Arm up the screen.
Inside our main loop, we can add a simple couple of lines.
// Waving
  // Default to Down
  ArmWave=1
  // Make it go up, if button is pressed
  If GamePad(ButtonA) then ArmWave=-1
Then all we need to do is add ArmWave to ArmHigh.
  // Add ArmWave to ArmHigh
  ArmHigh=ArmHigh+ArmWave
All together that comes to.
ArmHigh=220
BodyWide=40
ArmWide=70

Repeat

// We can change the CLS colour?
CLS 160,190,220

  // Snow White
  SetCol 255,255,255
  // Head
  Oval 320,200,64,64
  // Body
  Oval 320,260,96,96

  // Coal Black
  SetCol 0,0,0
  // Eyes
  Oval 320-10,200-10,10,10,5
  Oval 320+10,200-10,10,10,6

  // Carrot Orange
  SetCol 255,160,0
  // Nose
  Oval 320+5,200,20,5,4

  // Stick Brown
  SetCol 120,60,0
  // Arms
  Line 320-BodyWide,240,320-ArmWide,ArmHigh
  Line 320+BodyWide,240,320+ArmWide,ArmHigh

// Waving
  // Default to Down
  ArmWave=1
  // Make it go up, if button is pressed
  If GamePad(ButtonA) then ArmWave=-1

  // Add ArmWave to ArmHigh
  ArmHigh=ArmHigh+ArmWave

Flip
Forever
Our snowman is missing some important pieces of coal!
See if you can give him a few bits of coal to make a happy mouth, and maybe some buttons down his chest.
Can you add a couple of rectangles on top of his head to make a hat?
What about the floor? A big white rectangle to show where the floor is?